GITHUB Quick Howto
This howto guides you in setting up on your local workstation the
(forked) git repositories needed to contribute to the Open Data Hub project,
along with some troubleshooting concerning pull requests and merge
conflicts. For more detailed help, please refer to the online Github
help, at https://docs.github.com/en/.
Prerequisites
There are no particular requirements to be satisfied to set up a
workstation to work on Open Data Hub code, besides the standard
software git and an IDE of your choice.
However, depending on the contribution you want to give, you may need to install some of the software used by the Open Data Hub, so make sure that you read the Developer’s Flight Rules to understand if you need to install some more software.
You also need an account on Github to be able to fork projects and contribute to the Open Data Hub project.
Conventions
In the following documentation some example names are used. Please replace them with suitable values:
- Replace
$USERNAMEwith your username on GitHub. - Replace
$BRANCHwith the branch name you will develop in your forked version.
Project Checkout
Before starting the development, you need to fork the original (upstream) repository.
Navigate to the repository on GitHub, e.g., https://github.com/noi-techpark/bdp-core.
Create a fork of the repository by clicking on the Fork button. If you are not logged in, you will be asked for a github username and password.
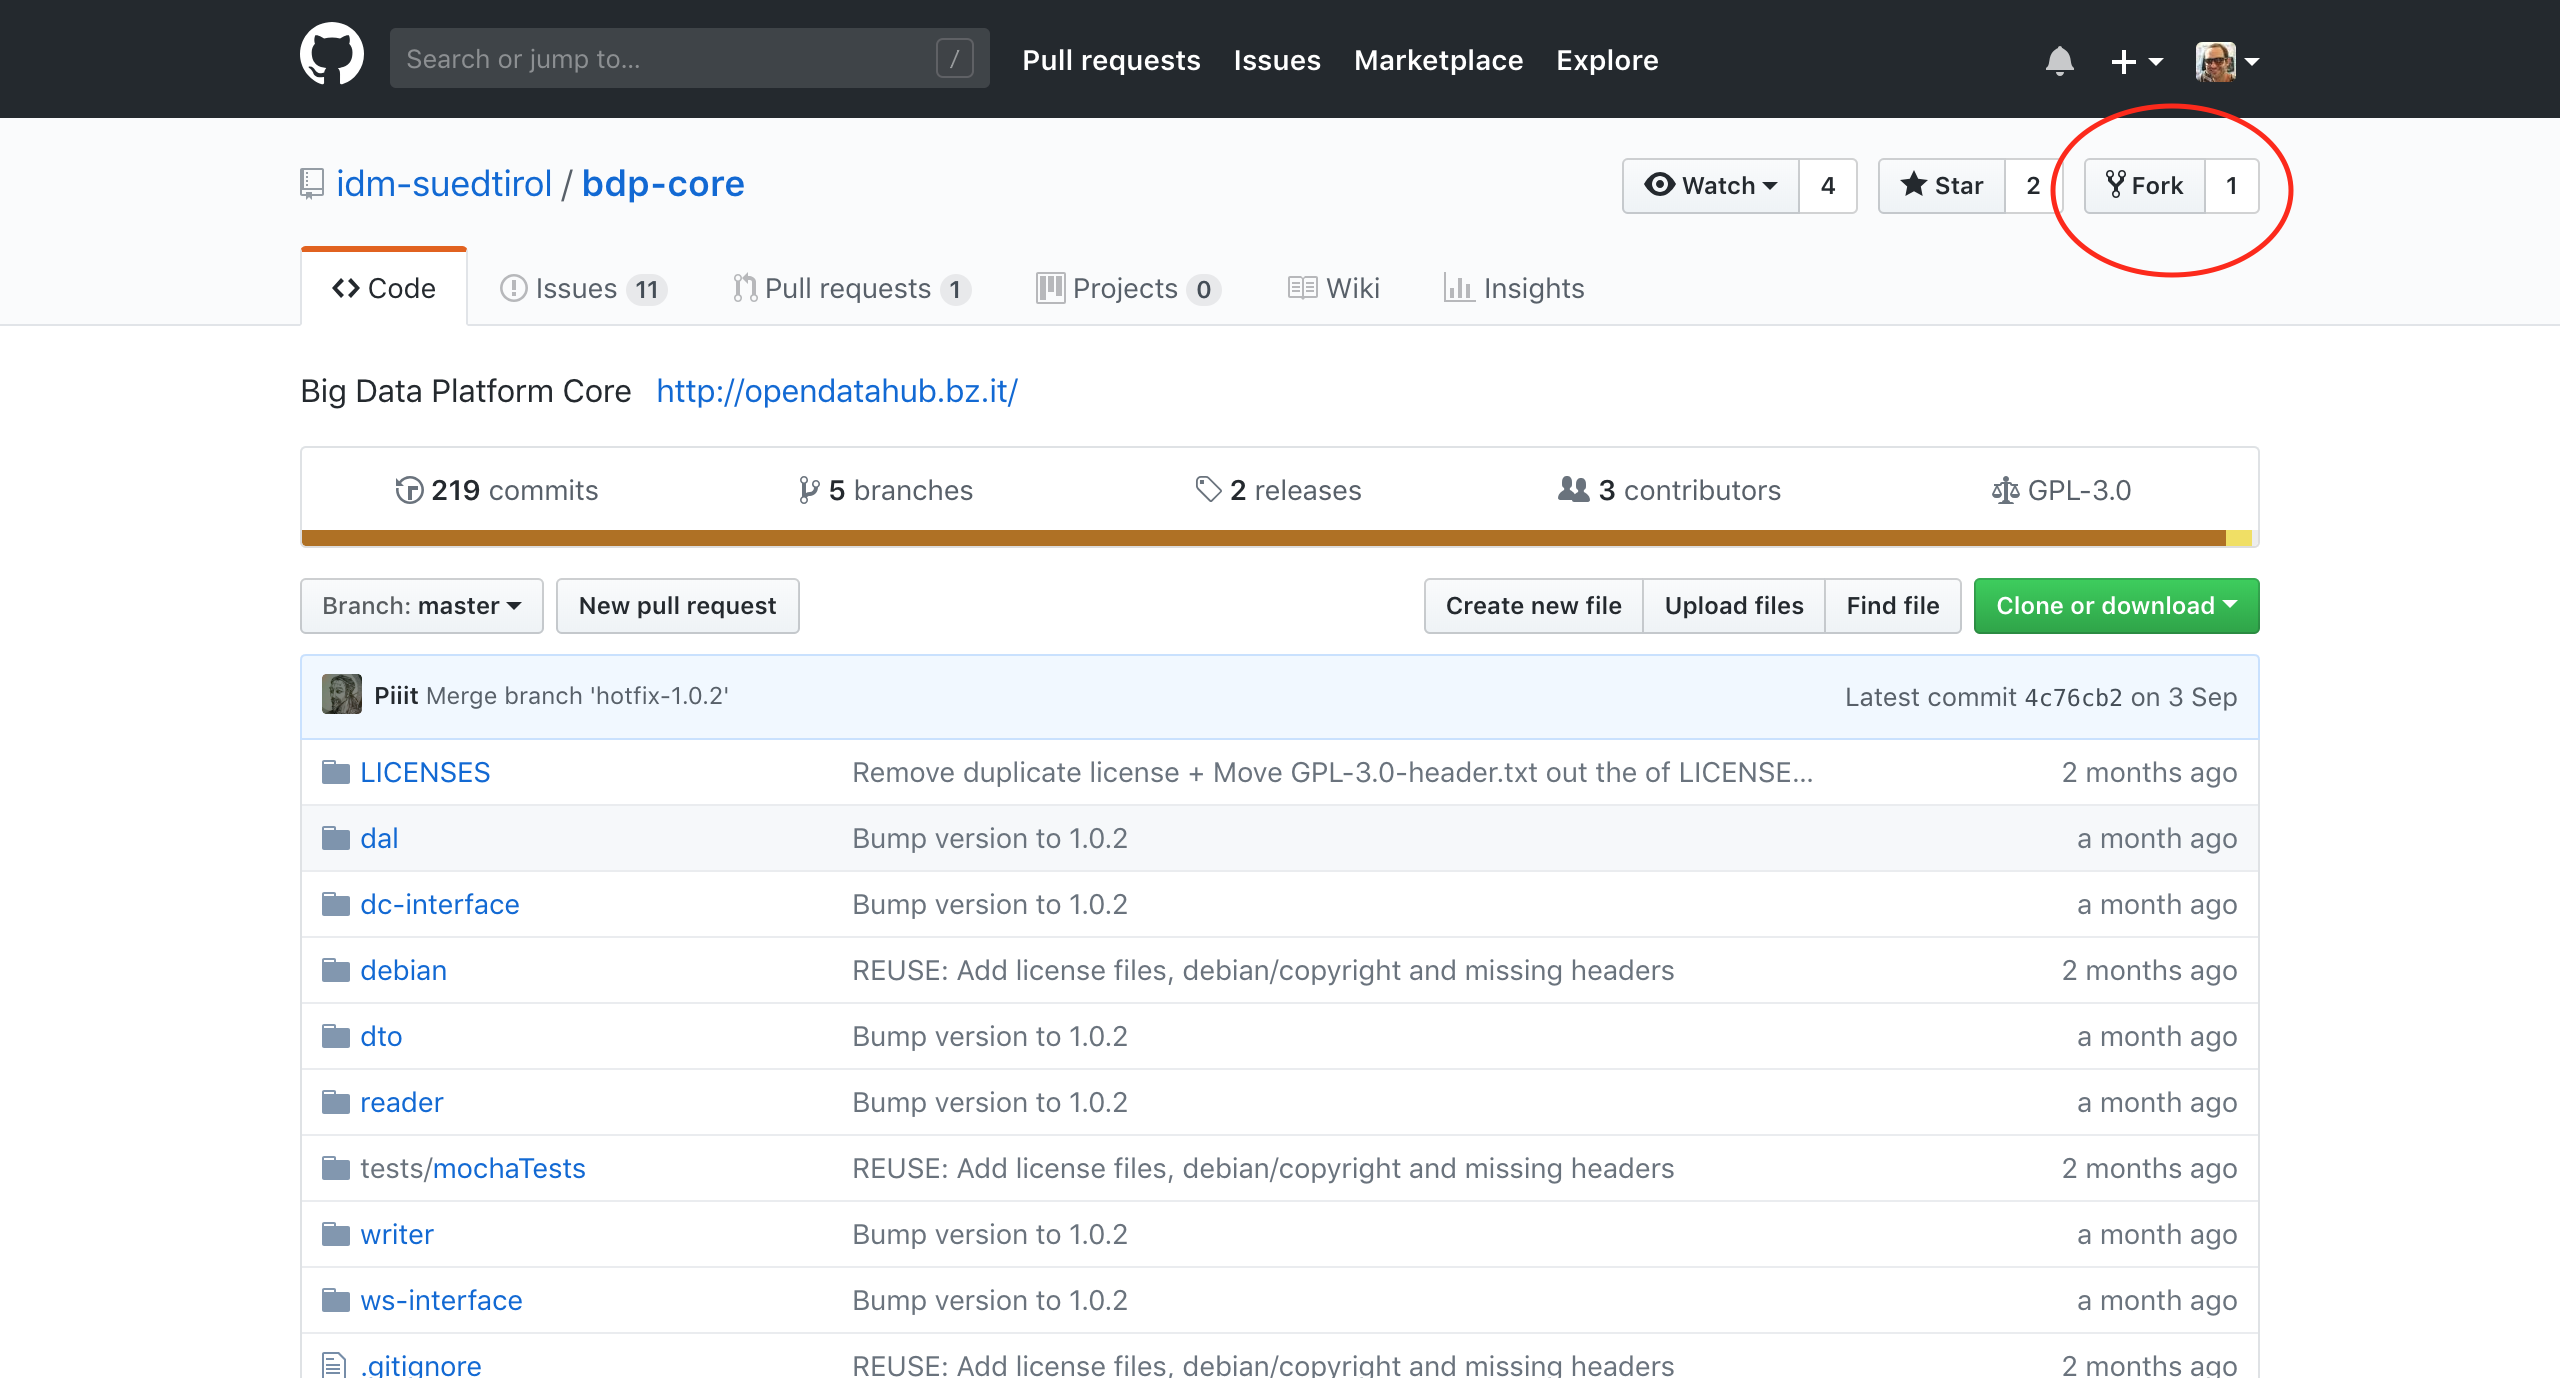
Figure 35 Fork the repository.
Navigate to your forked repository on GitHub, e.g., https://github.com/$USERNAME/bdp-core.
Check out the forked repository on your local machine, using the link that appears in your repository (see Figure 36):
~$ git clone git@github.com:$USERNAME/bdp-core.git
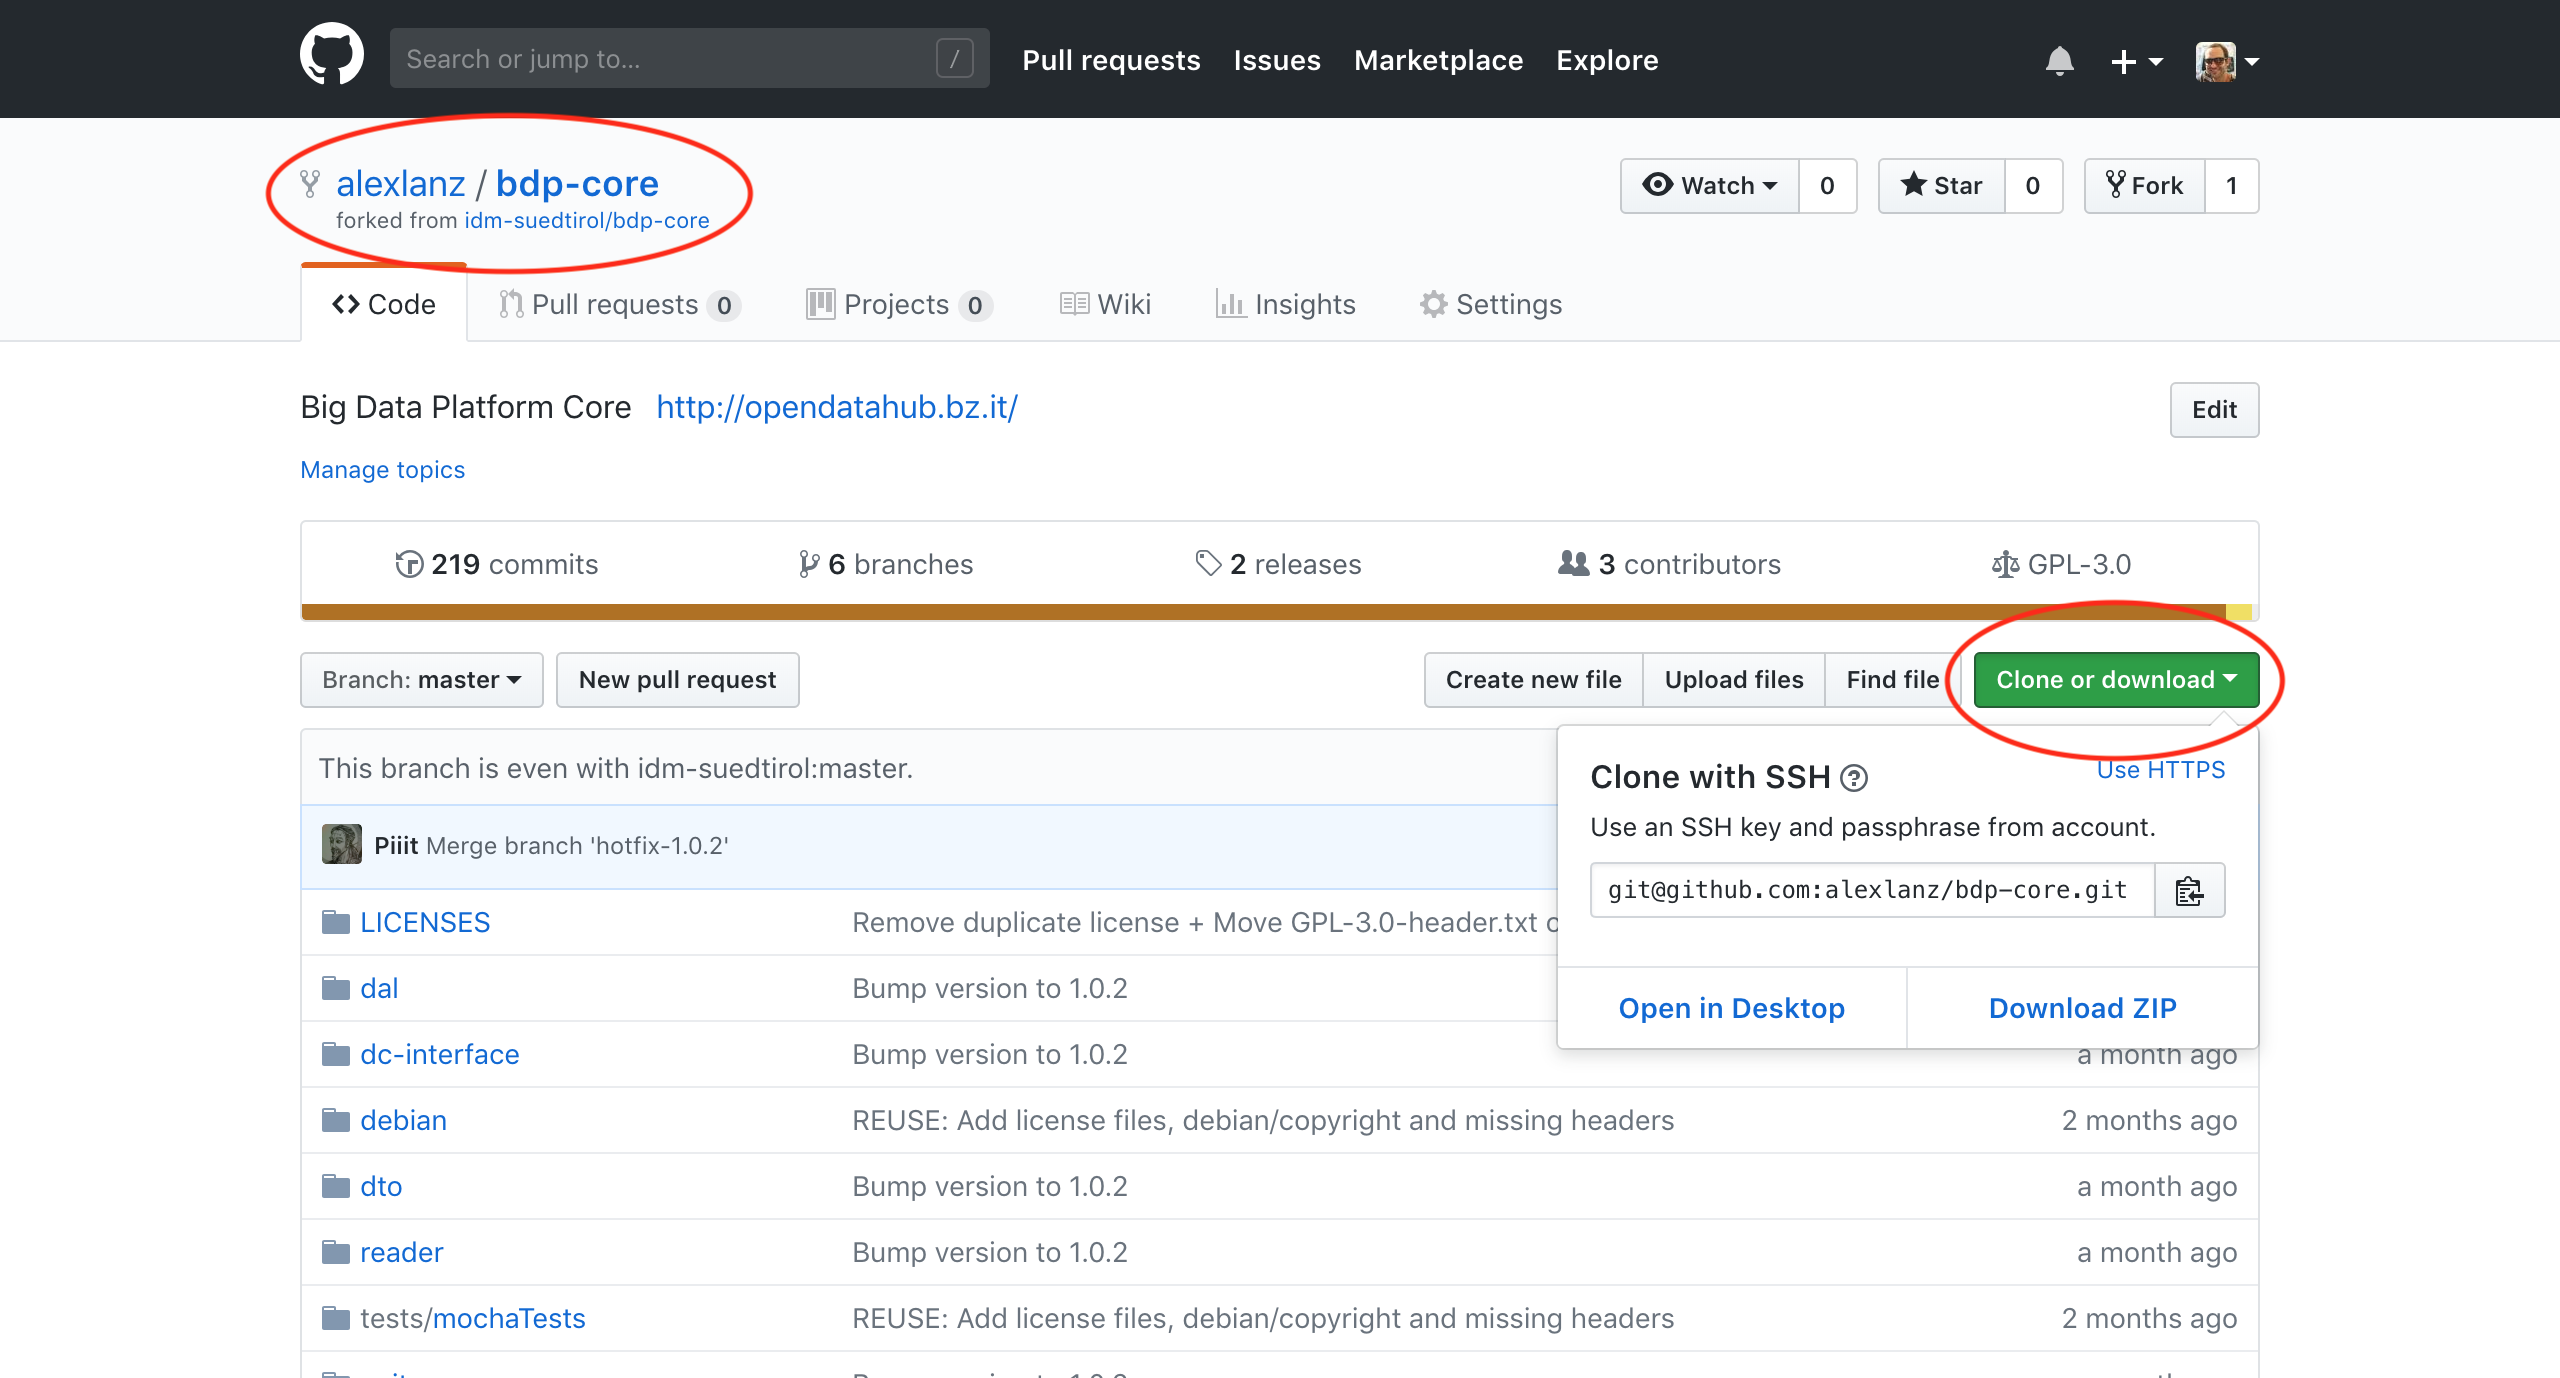
Figure 36 Clone the repository.
Create a pull request
In order to let your contribution be accepted in the Open Data Hub code base, you need to follow the following steps.
Checkout the development branch:
~$ git checkout development
Create a new branch from the development branch locally on your machine:
~$ git checkout -b test-branch
Make some changes to the code and commit them:
~$ git add -A
~$ git commit -m "Some commit message"
Push the new branch to GitHub:
~$ git push --set-upstream origin test-branch
Navigate to your feature branch on Github (https://github.com/$USERNAME/bdp-core/pull/new/$BRANCH) to create a new pull request (see Figure 37).
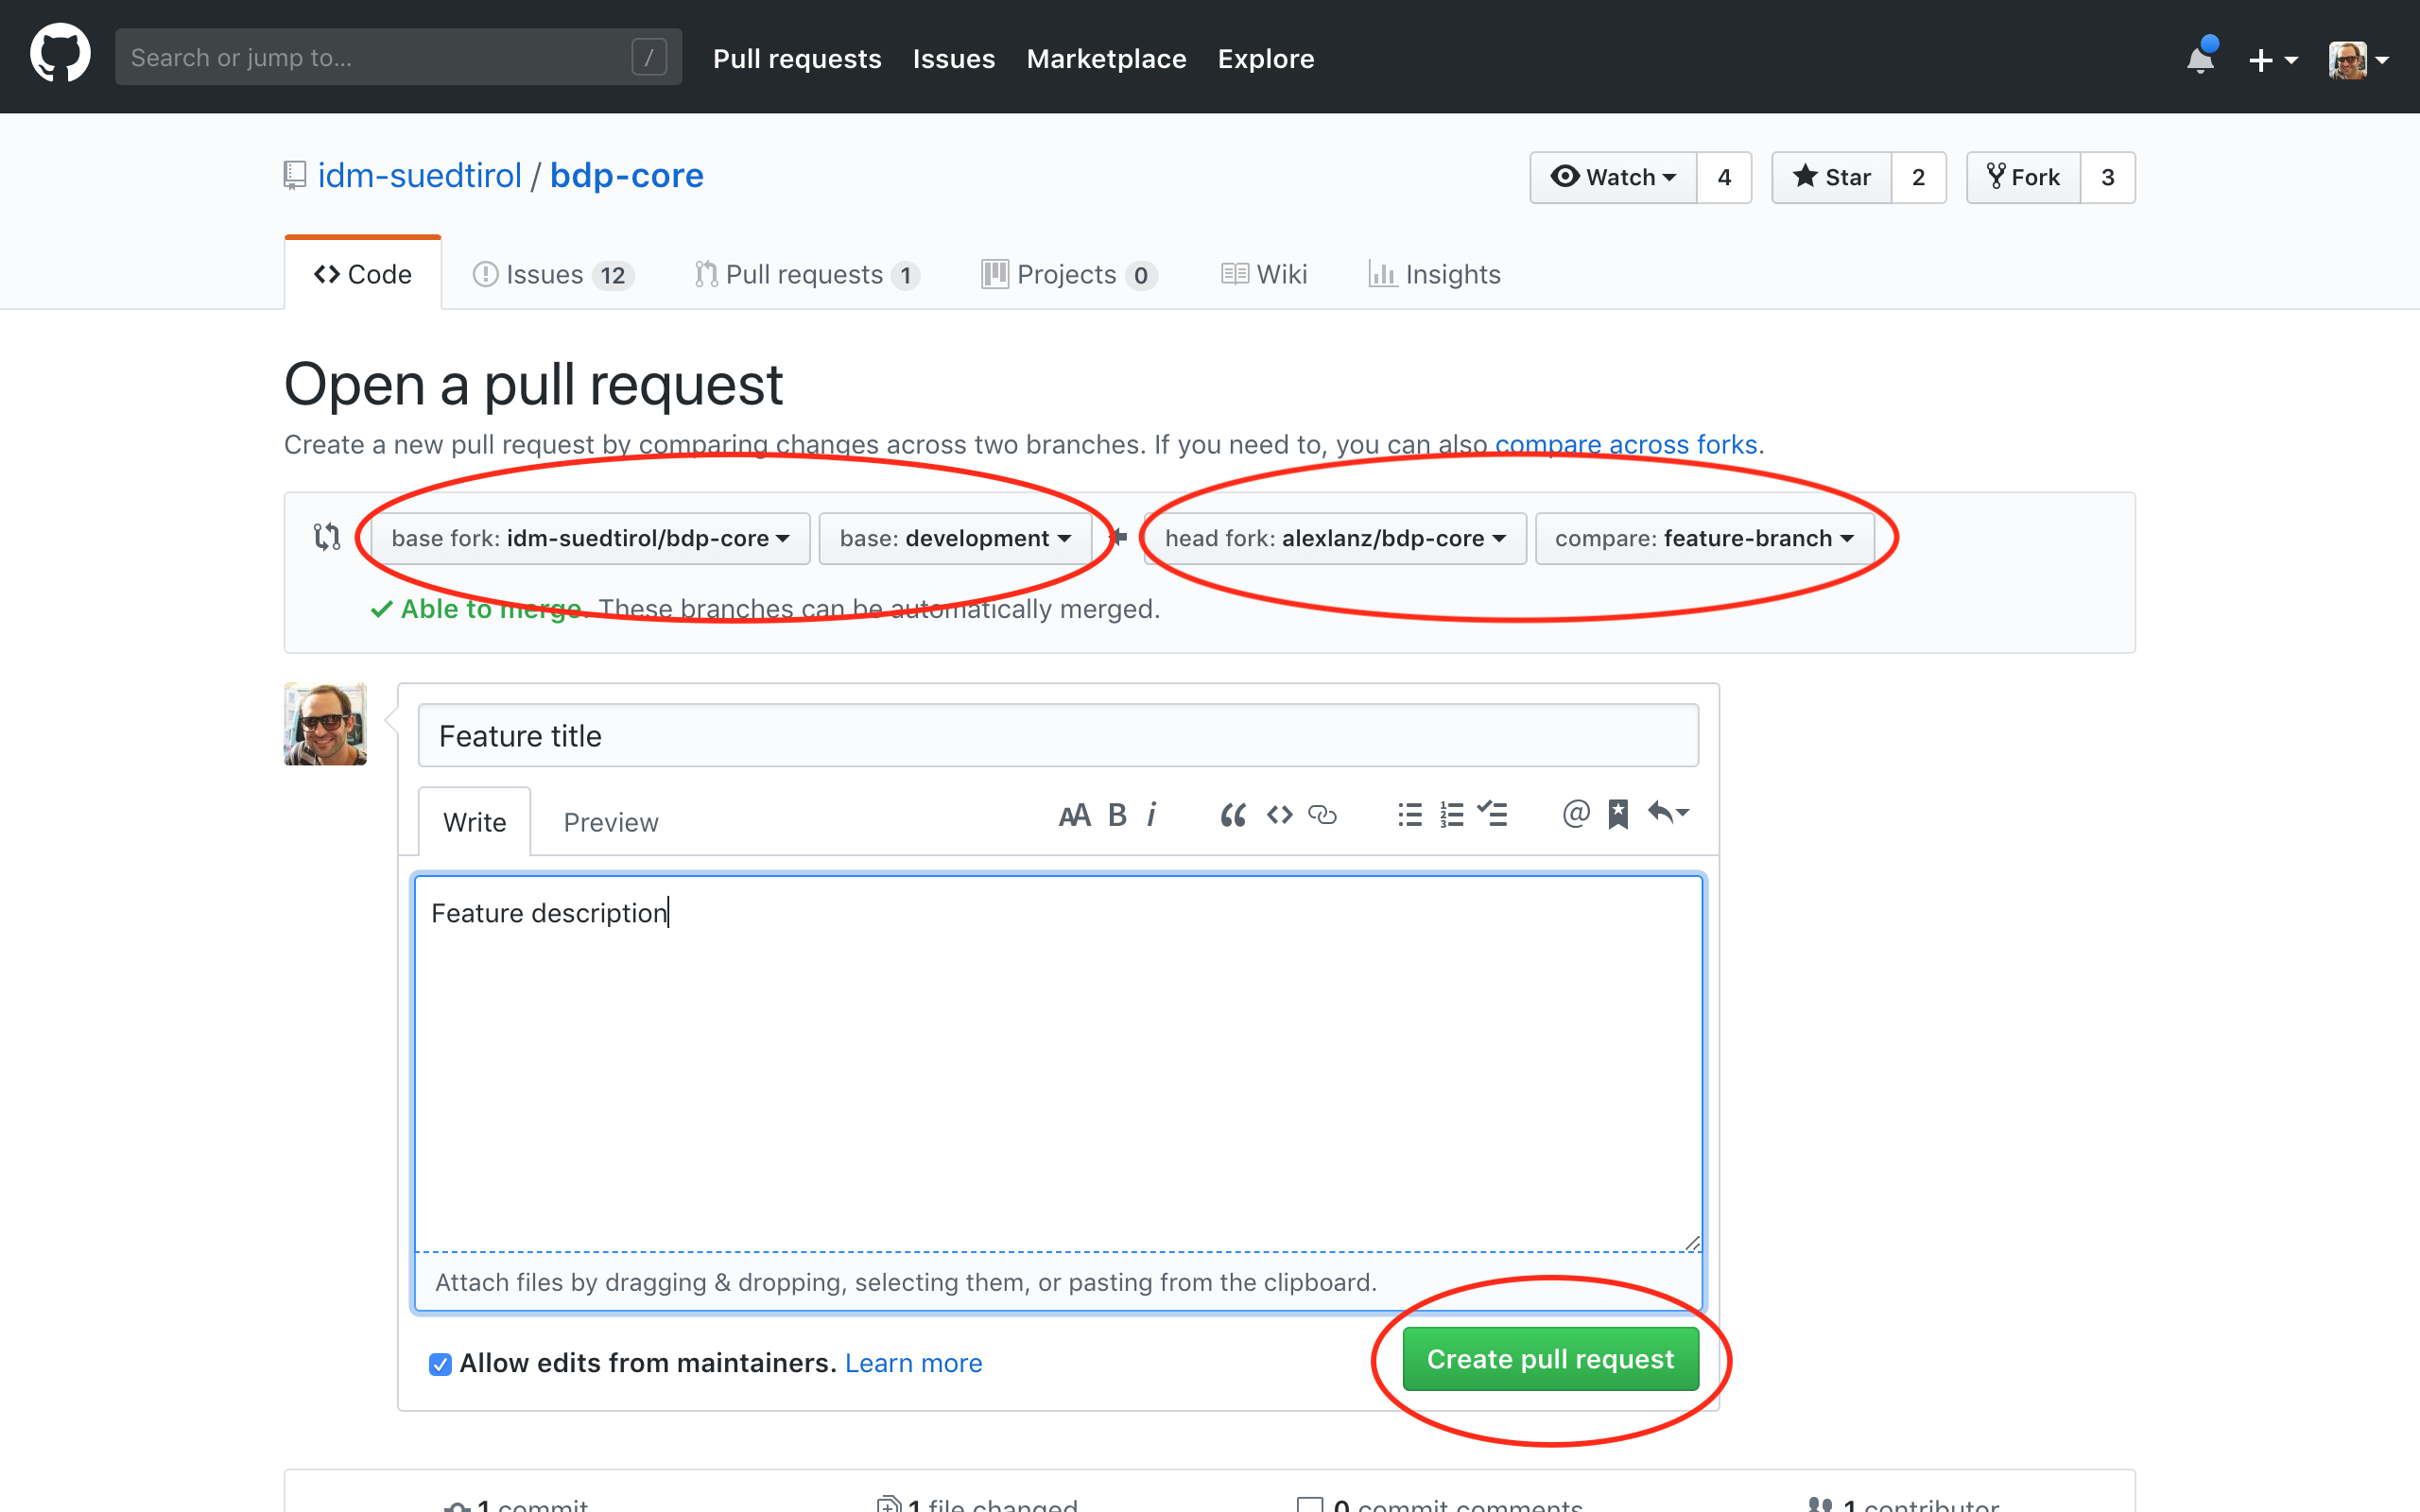
Figure 37 Create a pull request.
You can write some description as well, to describe your changes.
Commit and push any changes of the pull request to this new branch.
For every commit the continuous integration pipeline will execute the tests and display the results in the pull request, like shown in Figure 38
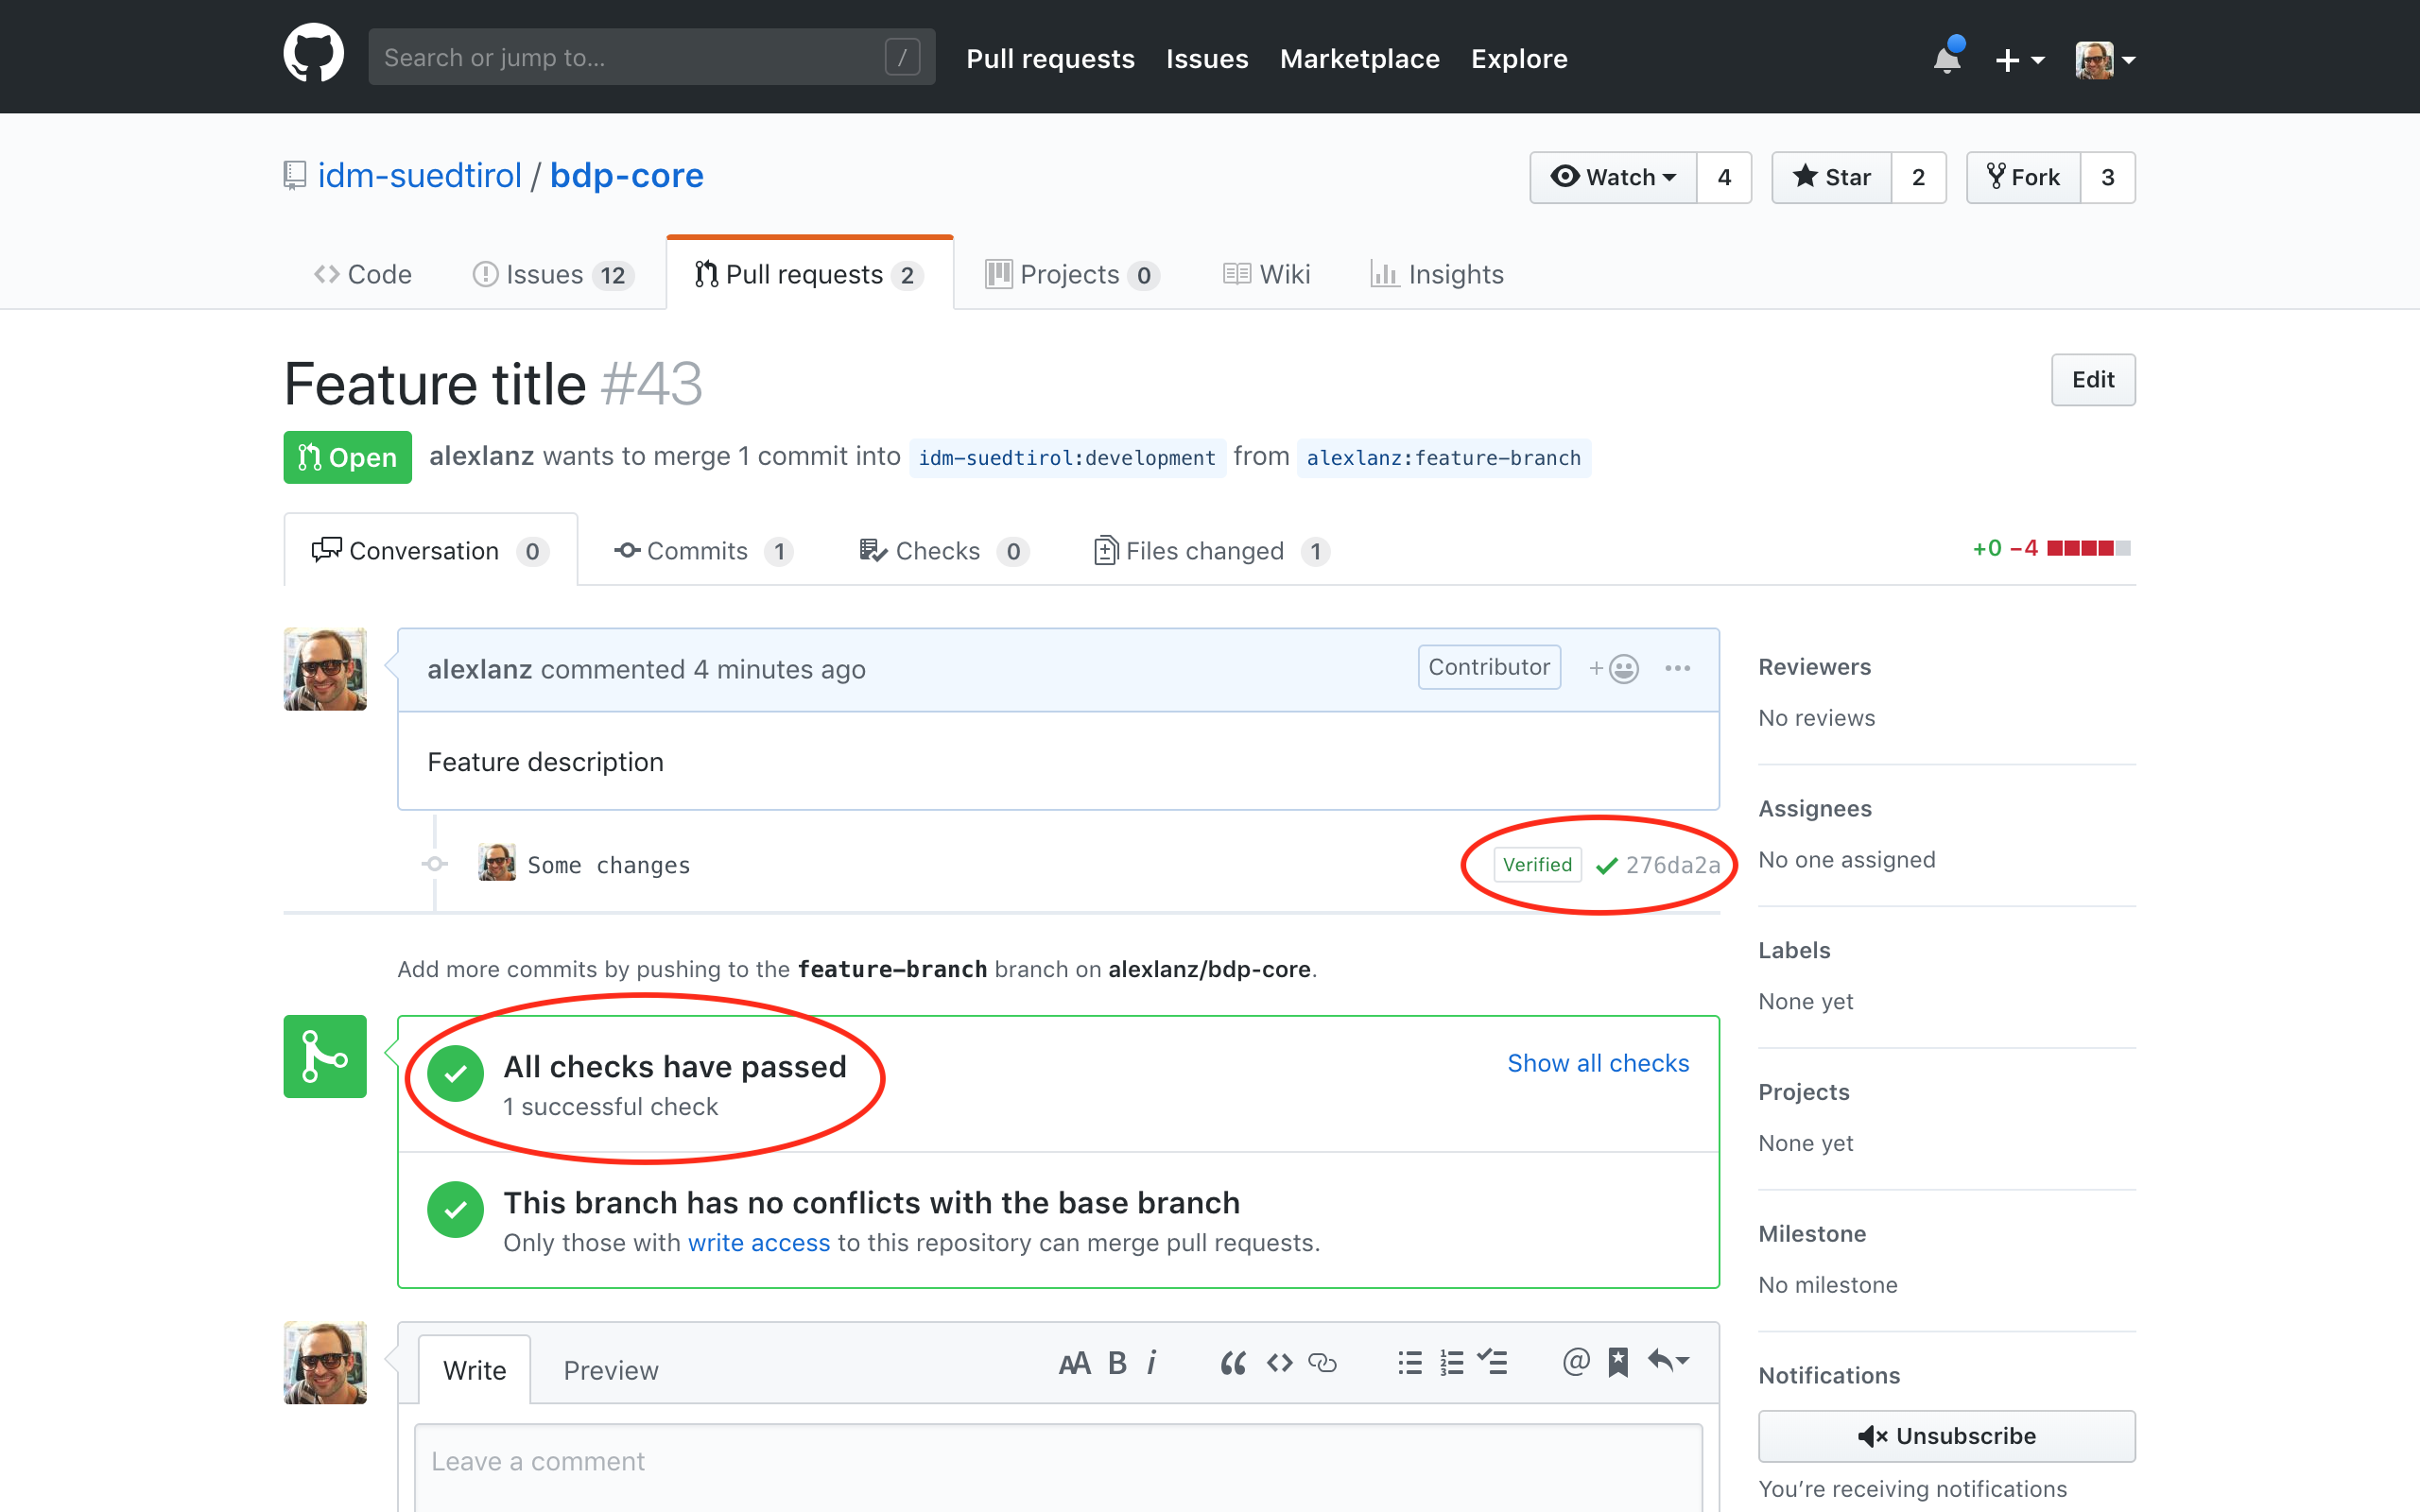
Figure 38 Show outcome of a pull request.
In addition, the detailed logs can be viewed under https://ci.opendatahub.com.
Syncing a Fork
Your forked repository does not receive the updates of the original repository automatically. To sync for example the development branch of the two repositories and to keep the forked repository up-to-date with all the latest changes of the development branch from the original repository, the following steps have to be performed.
Before you can sync your fork with the original repository (an upstream repository), you must configure a remote that points to the upstream repository in Git. A more detailed description for the following steps can be found in the online Github help.
List the current configured remote repository for your fork.
~$ git remote -v
Specify a new remote upstream repository that will be synced with the fork.
~$ git remote add upstream https://github.com/noi-techpark/bdp-core.git
Verify the new upstream repository you’ve specified for your fork.
~$ git remote -v
You need sync a fork of a repository to keep it up-to-date with the original repository (upstream repository). A more detailed description for the following steps can be found in the online Github help https://docs.github.com/en/pull-requests/collaborating-with-pull-requests/working-with-forks/syncing-a-fork.
Fetch the branches and their respective commits from the upstream repository. Commits to development will be stored in a local branch, upstream/development
~$ git fetch upstream
Check out your fork’s local development branch.
~$ git checkout development
Merge the changes from upstream/development into your local development branch. This brings your fork’s development branch into sync with the upstream repository, without losing your local changes.
~$ git merge upstream/development
Resolving Merge Conflicts
When creating and working on a pull request, it could happen that the destination branch of the original repository will change. These changes could result in merge conflicts when pulling your code, like shown in Figure 39.
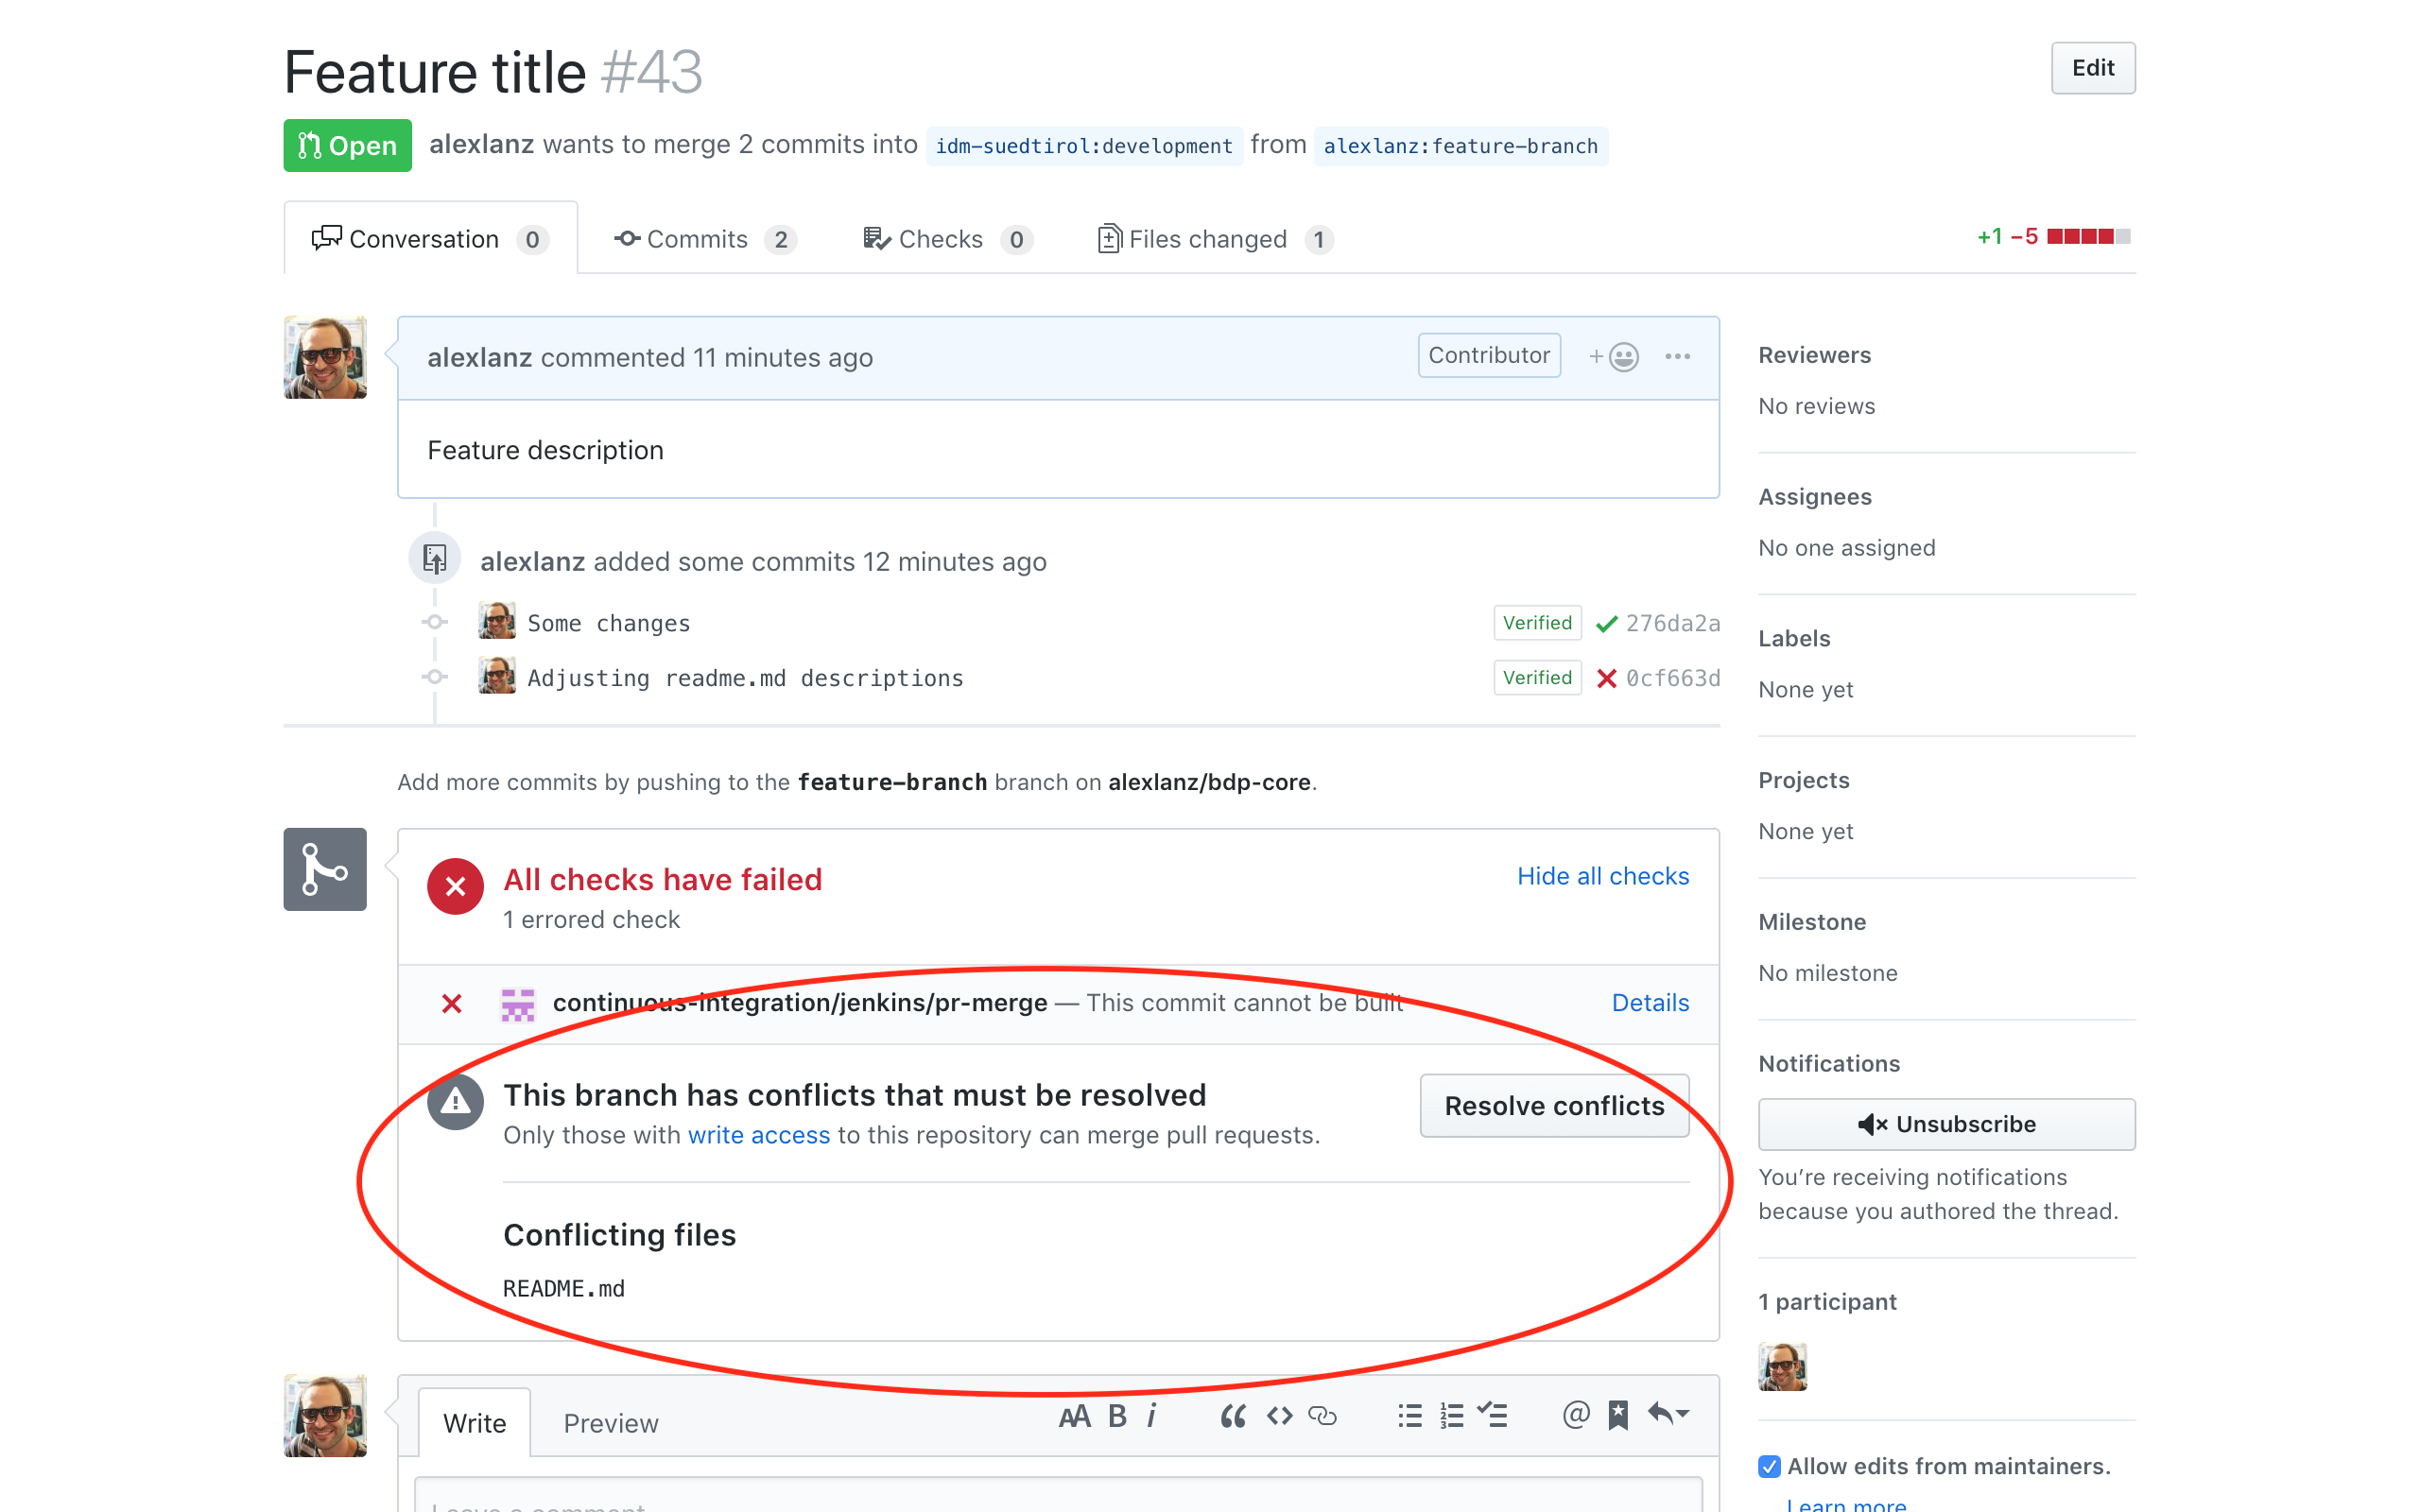
Figure 39 A Merge Conflict.
To resolve merge conflicts, the following steps must be performed.
Sync your forked repository and make sure your local destination (development) branch is up to date with the original (upstream) repository branch.
Check out your feature branch (replace $BRANCH with the actual branch name).
~$ git checkout $BRANCH
Merge the changes of the development branch to the feature branch.
~$ git merge development
The command will output the files with merge conflicts. See sample output in Figure 40.

Figure 40 Merge conflicts output.
Go the the listed files of the previous output and resolve all merge conflicts. The conflicts in the files begin with
<<<<<<<and end with>>>>>>>. The=======separates the two versions.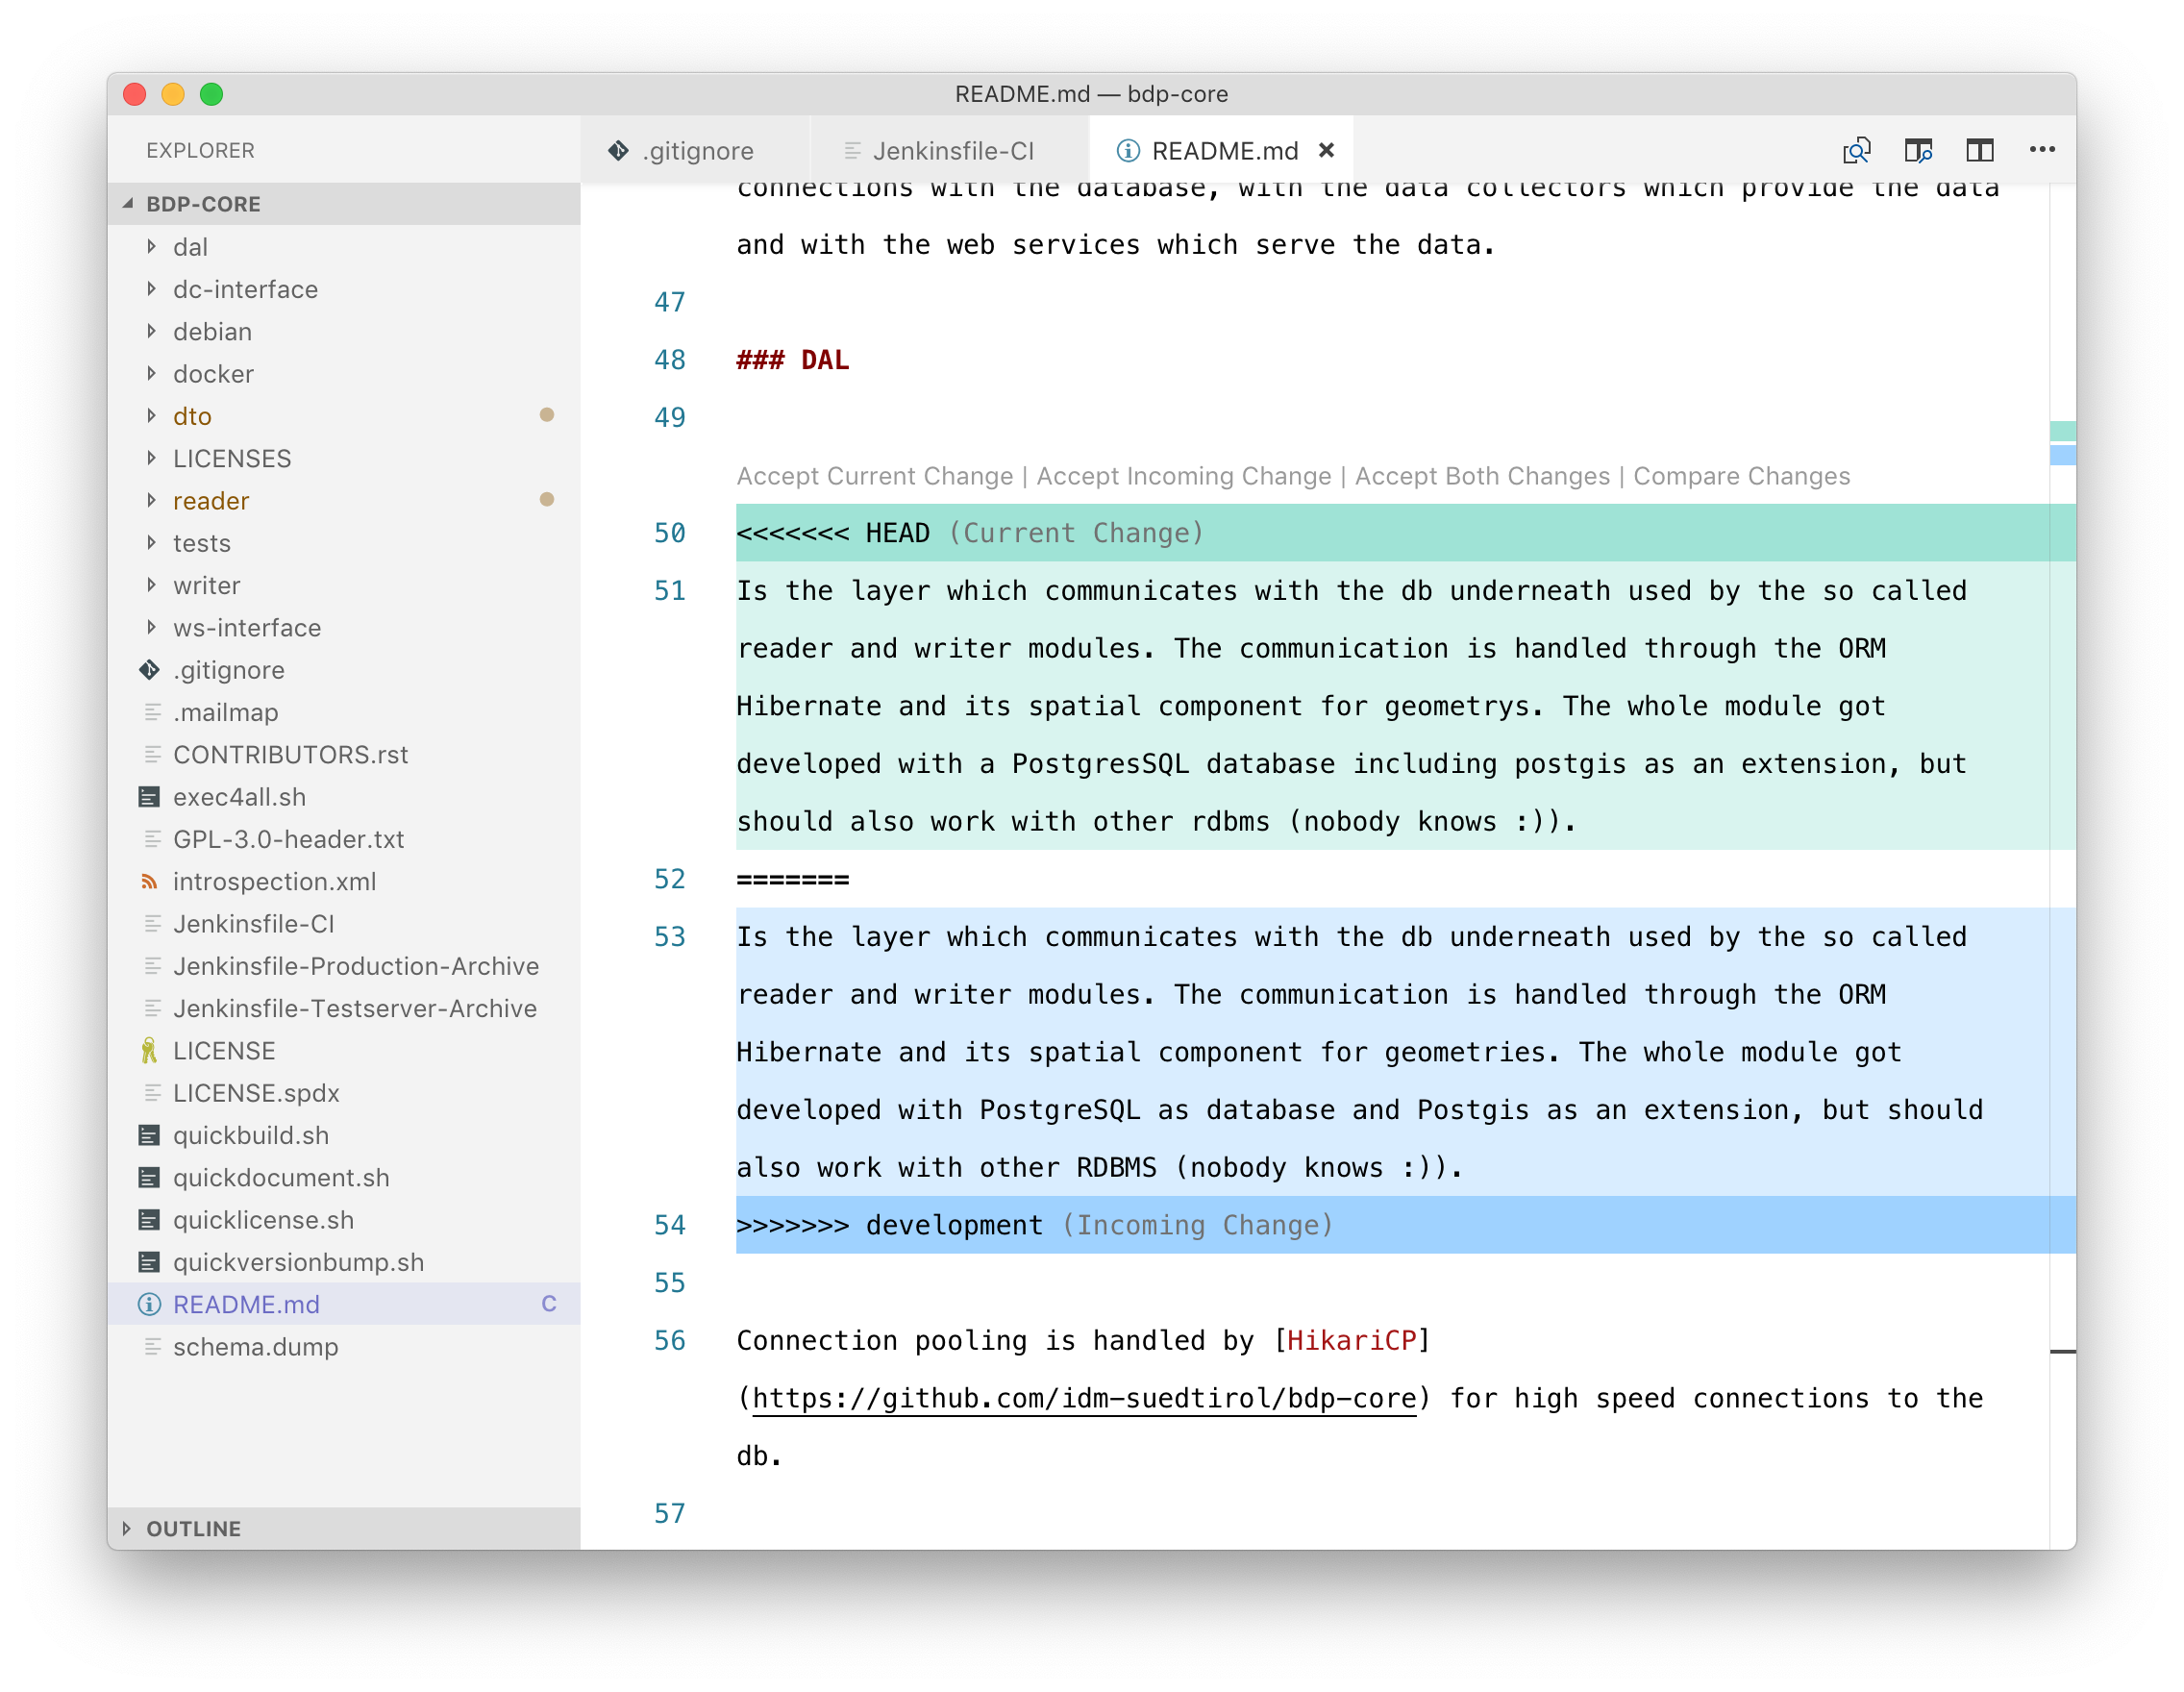
Figure 41 Solving a merge conflicts.
You can resolve a conflict by simply deleting one of the two versions of the code and the inserted helper lines beginning with
<<<<<<<,=======, and>>>>>>>.If none of the two versions is completely correct, then you can delete the conflict entirely and write your own code to solve the conflict.
Add all resolved files to the index, commit the changes and push the changes to the server.
~$ git add -A
~$ git commit
~$ git push
After resolving the merge conflicts, the pull request can be accepted.
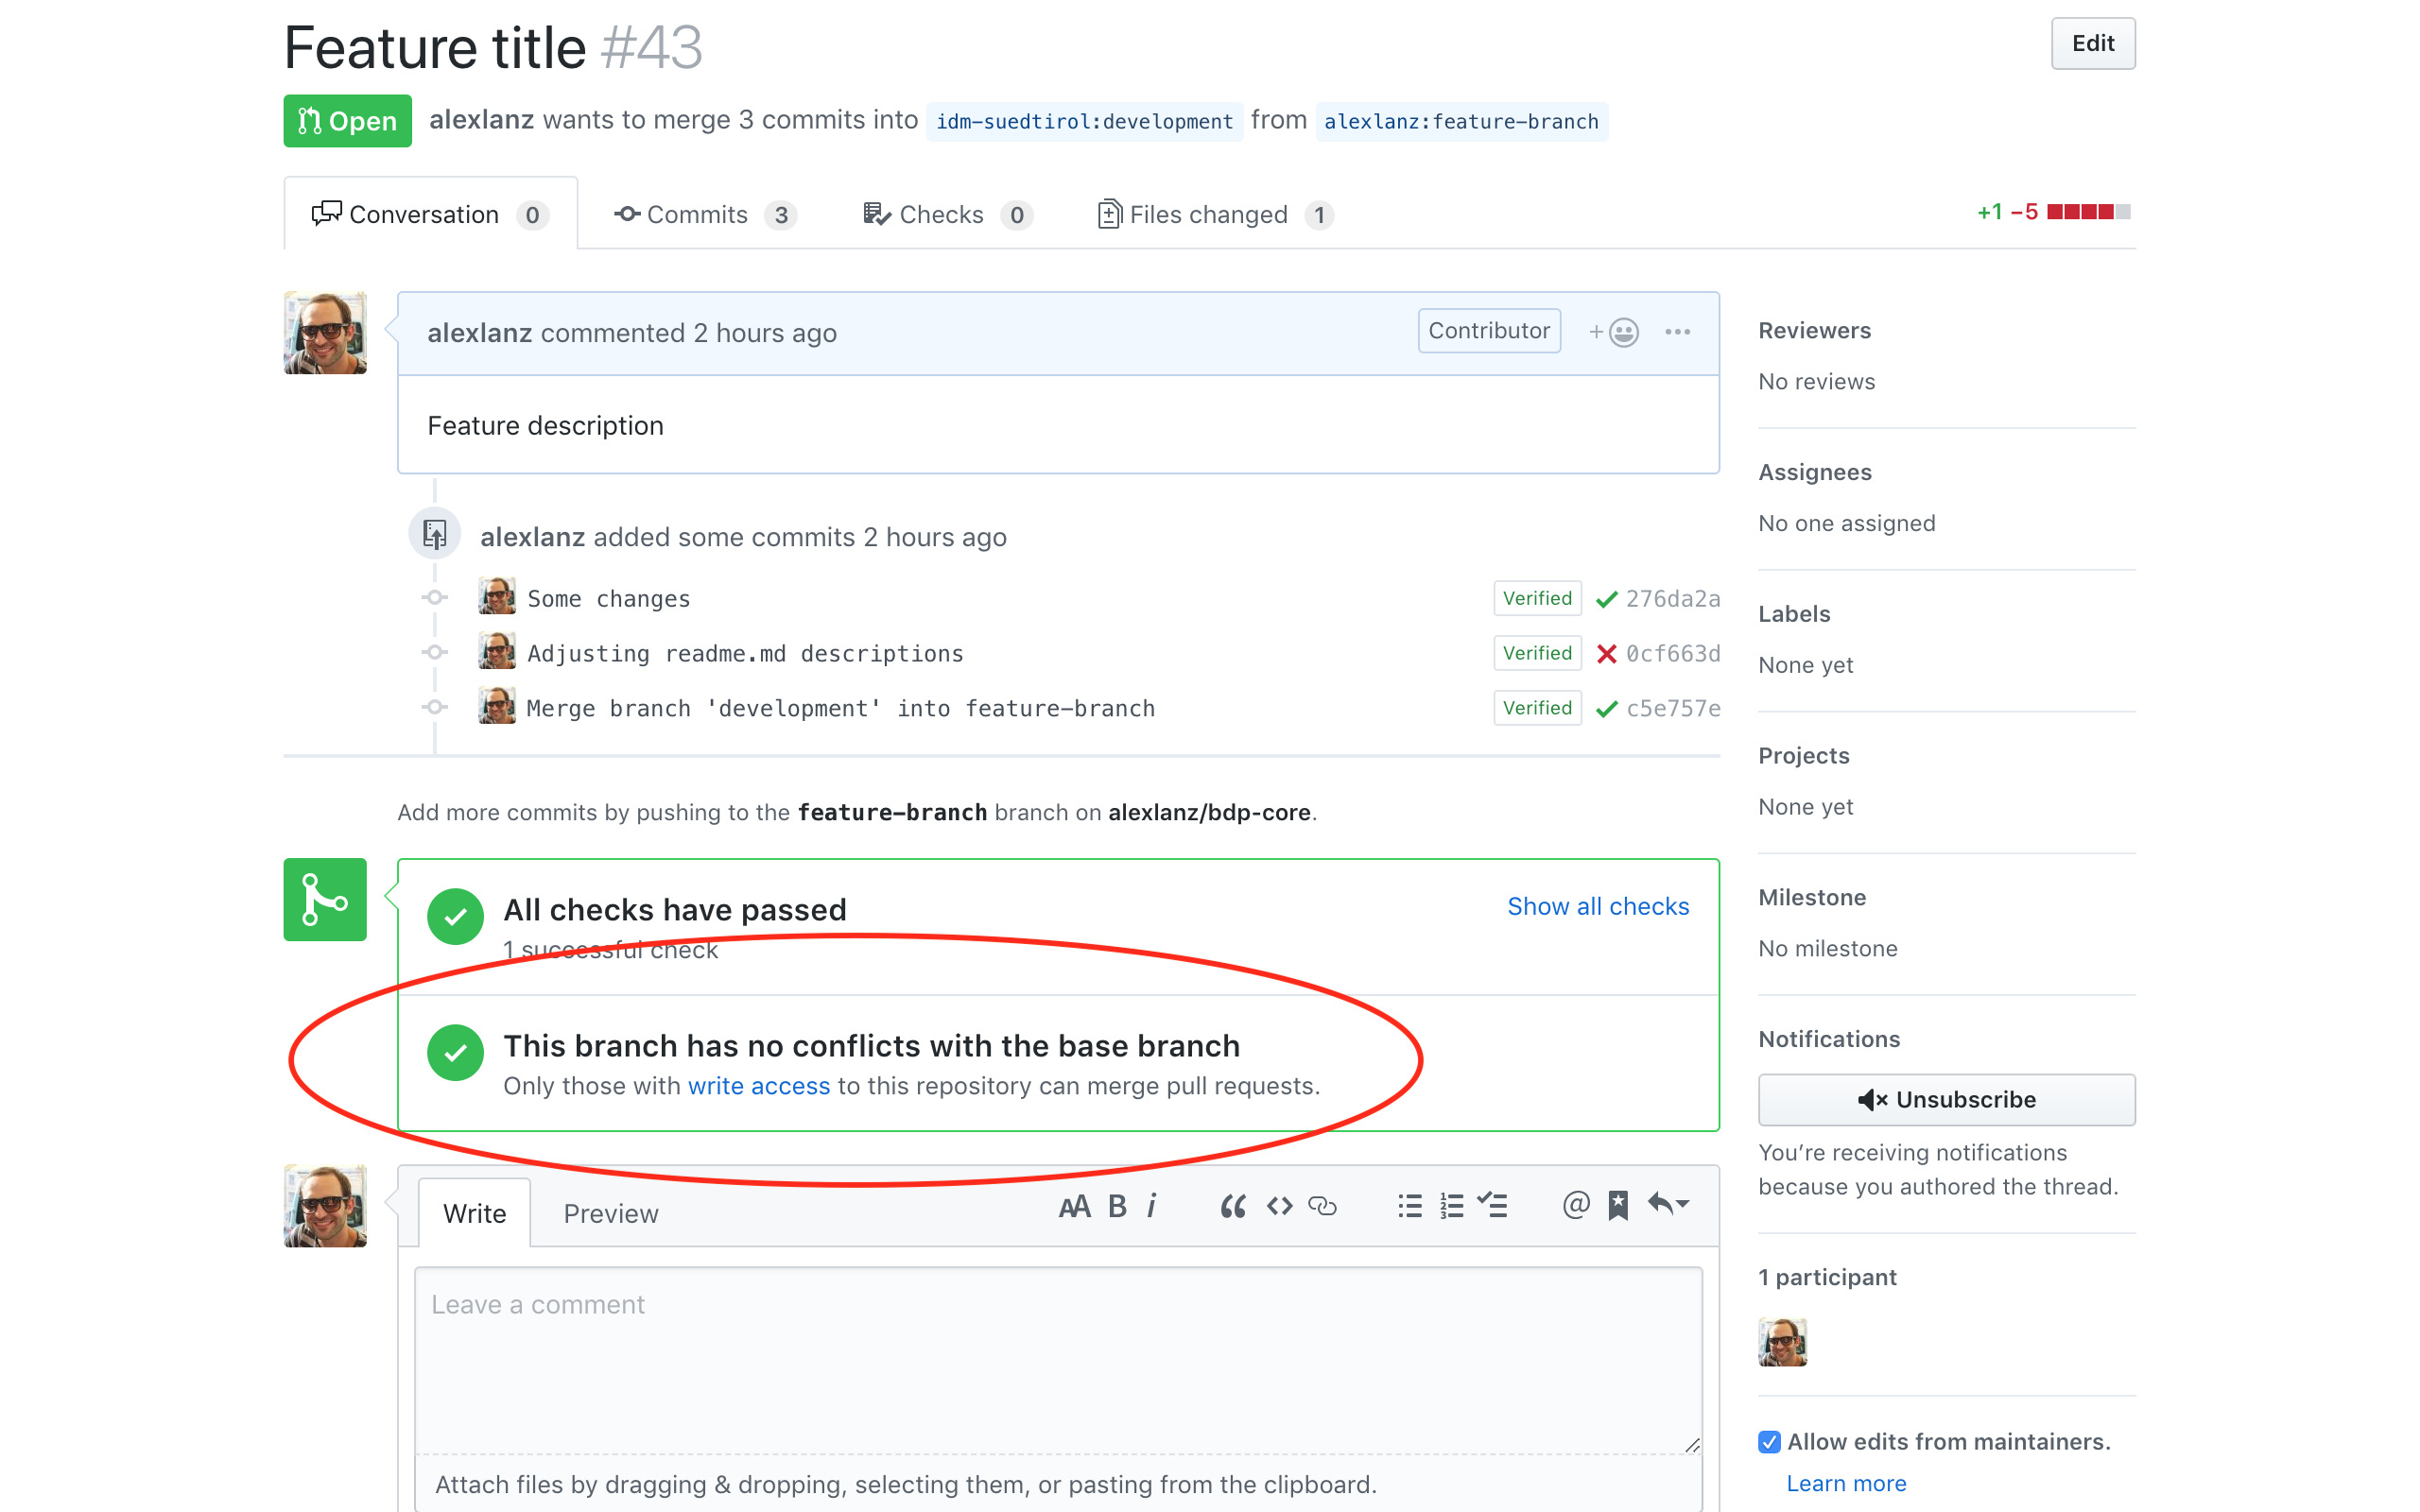
Figure 42 A solved merge conflict.
A more detailed description can be found in the online Github help: ttps://docs.github.com/en/github/collaborating-with-pull-requests/addressing-merge-conflicts/resolving-a-merge-conflict-using-the-command-line